Thursday, February 28, 2013

Thrifty Thursday: #1


Welcome to the first Thrifty Thursday here at Madcap Frenzy.
This new feature is where I show off some of my thrifty finds and some ideas I have for them or high priced variations that are my inspiration to knock off, as well as other deals I've found. hehe

1. Among the thrifty finds this week, is this adorable chandelier.


 It was up for sale for $4 (yes, only $4!) on an online yard sale site. I showed it off yesterday in our Work it! Wednesday, as a project that is on our todo list. We haven't figure out where exactly we want it- hallway, dining room, or spare bathroom. Either way, I want this baby black, with some jewels drapped from it. Similar to this adorable chandelier, $145 from Frankie:

2. Also, recently my hubs and I took a trip to our local Salvation Army in search of our perfect '80s prom party outfits. We were super successful in our finds (I won't show them off just yet though, I'll show them when we have the party- don't want any spoilers!).
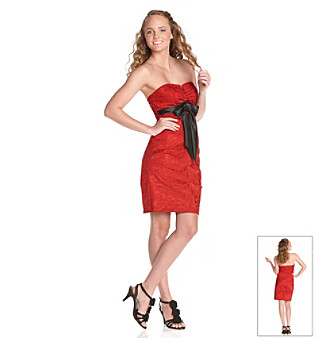
While there, I came across this ADORABLE red strapless dress for $6.50. My plan for it is to wear it for an press awards dinner coming up in April.


I'm thinking of pairing it with a black balero jacket, black jewelry, black belt and black heels. What do you think would look nice paired with it? I was thinking something along these lines but with a jacket and necklace, from Younkers:

3. Another thrifty find I wanted to share, I actually got a few months ago, but realized I didn't really talk about it. I found this adorably cute blue typewriter for sale on an online yard sale site for $10 (or $15, I can't remember what we settled on). Anyways, it works and is soooo cute! My mom got rid of my typewriter when I was younger, as I didn't use it then, however I was kicking myself for not holding on to it. When I saw this cutie on the site, I jumped at the chance to call it my own.


Right now it is in my craft room/office (makes sense), since we don't really have any "blue" anywhere in the house (what a shame, now that I think about it). I might try to dress up its little corner or lend it to my friend who is getting married (with blue is one of her colors), similar to something like this from the knot:


4. Lastly for Thrifty Thursday, I just want to show off this deal through Lean Cuisine. Since I'm a Weight Watchers supporter, Lean Cuisines are perfect for your points plus. They also have gotten so much more tastier! So if you're getting some quick meals for work or at home, pick up Lean Cuisines and don't forget about the codes inside the boxes. You could score a free lunchbox, if you enter 20 codes before March 31st! I have already gotten 2 free lunchboxes and 2 free magazine subscriptions through Lean Cuisine's Delicious Rewards program since I started entering my codes within the past 2 years, and I have another lunchbox (the purple one) on the way! If you don't want your codes, feel free to send them to my way. haha But anyways, don't forget about the codes!


So, I thought I'd tell ya'll about my thrifty finds and deals I've scored. I hope to make this a weekly thing, but if I don't score any deals a week, obviously there won't be a thrifty thursday that week. (I know, gasp!- a week without scoring a deal?!) Hopefully that doesn't happen ever. haha
Anyways, Happy Thursday all!
-M


Wednesday, February 27, 2013

Work it Wednesday: #1


Welcome to the first "Work it Wednesday" over at Madcap Frenzy.
I'm trying something new over at the blog-o, to hopefully jump start my creativity and jump start the blog from its laziness of last year.
So this new weekly feature is kind of an update to what we are working on this week, when it comes to projects around the house or in our lives.

Our current in-progress projects include:

1. Re-painting our yard sale find of a chandelier

(Got this baby for $4. Oh yeah!)


2. Gathering items and creating decor for our '80s prom birthday party 


(I've already created the main signs for the party, one above, 3 others not shown, picked up the streamers and tableware, got my outfit, I just need to fix up the King & Queen crowns, cutout the letters for the lightup sign, make the "photo booth" backdrop, makes some banners, plan out the menu, and create the Superlative awards)

3. Stenciling the 1/2 bathroom downstairs and bling it out


(I picked up a damask stencil and some glossy paint. We shall see if this is too thin of paint, or if it is perfect, or if it works as a "shadow" effect, and I go and add a darker color over top)

4. Make benches outdoor friendly and re-cover cushions for outdoor seating

(The plan for the firepit benches)


 (The possible "fabric" aka. PEVA tablecloths which match these pillows I found first below, perfectly!)

(All I have to find is some pale yellow tablecloths and I will have enough to cover all of the cushions for the benches AND match these pillows)

These are just some of the projects on our plate that we hope to finish this week (or even this month). We may finish all, we may finish none, but in the end, we will Work It! Or at least try to make it all work. haha

And have you linked up a project at my first ever Link Party? Link away over at the Totally Tuesday link party!

What are you working on? Feel free to share in the comment section or on Facebook. I love to see "in-progress" projects!
Have a great day!
-M

Tuesday, February 26, 2013

Totally Tuesday: #1- Link Party time!


Hello, and welcome to another weekly feature I hope to make a habit of.
Since today is my birthday, I have decided to host my first ever link party! Yay!
Down the line, Totally Tuesdays might become something else other than a weekly link party, as I haven't figured out what I want it to be all about at the moment. But for now, its is all about the linking up!
Your links are my birthday present!
I have found that link parties are my favorite way to see what everyone else is doing these days, as well as being the number one driver of traffic to my posts (besides google and pinterest).
So, if you have a post you'd like to link up, have a go! I'd like to feature some of my favorite linked items the next week, so please link away!

Here are some ground rules for the Totally Tuesday link party:
  • Follow the Host- that's me! (see the social media buttons in the right corner of the blog).
  • Link up your own projects- no giveaways or advertisements please. (you can link as many projects as you'd like, but don't link up the same projects you linked up before (this will be the case next week)). I'd prefer the project be within the past 2 weeks or so, if possible.
  • Please comment on at least a few of the people who've linked up below! We all love to hear what you have to say. I'd love for ya'll to also drop me a comment on my blog here too! I'd love to get to know my fellow bloggers and followers. Even if you don't link something up, I'd love to hear from ya'll!
  • Please add my link button to either your post, sidebar, link party page, somewhere. Please, if it isn't anywhere on your blog, I don't have the heart to feature you, as this link party helps me out too!
You can get my link button from below or from the sidebar to the right:

Madcap Frenzy
I'll start us off with one of my links, but don't worry, I won't feature my own post haha.

Thanks all and have a great day! I'll be off having my birthday meal at my favorite Italian restaurant with friends and family. Yay! Happy birthday to me!
Happy day!
-M


So now onto the first ever Totally Tuesday Link Party!


Monday, February 25, 2013

Pinspiration Monday: #1


Welcome to a new weekly feature here at Madcap Frenzy.
I hope to show off some of my favorite projects, images, quotes, recipes, etc. that I have come across on Pinterest.
Hello, my name is Morgaine, and I am a Pinterest addict. (At least according to my husband and my friends).
There is just something about Pinterest that is so me. I think when I really started the Pinterest addiction was when we first put our bid on our house- I immediately started dreaming up the decor of each room and ideas I had for the house. Now it took us 9 months to get our house from that first bid, but Pinterest has helped me in planning the rooms, one-by-one (I had 9 months to plan them, after all).
With all that being said, I happily encourage ya'll to pin up a storm across my sites and blogs.
So, without further ado, welcome to the very first Pinspiration Monday!

1. Lilikoi Joy: Upcycled Door Mirror

http://www.lilikoijoy.com/2013/02/upcycle-door-mirror-from-drab-to-fab.html
Source: http://www.lilikoijoy.com/2013/02/upcycle-door-mirror-from-drab-to-fab.html
So, I totally have a door mirror that was left by the previous owners of our house, that has been sitting in our master bathroom just WAITING to have something like this done to it. Making it silver would match the room too! Such a cool idea!

2. Just a Taste: Homemade Samoas (Caramel DeLites) Girl Scout Cookies

http://www.justataste.com/2013/02/homemade-samoas-girl-scout-cookies-recipe/
Source: http://www.justataste.com/2013/02/homemade-samoas-girl-scout-cookies-recipe/
So, I am what you call a "forever girl scout." I was a girl scout from 1st grade straight through graduation of high school. I got my Girl Scout silver and gold awards, worked at girl scout camp for 2 years and sold more boxes of cookies than I could ever remember to count. So finding a recipe that you can make your own girl scout cookies, and my favorite ones at that?!-OMG! I really want to try to make these, but I'm afraid I'm going to become addicted and won't be able to stop!

3. East Coast Creative: How to Spray Paint a Chandelier

http://www.realhousewivesofbuckscounty.com/2012/04/how-to-spray-paint-chandelier.html
Source: http://www.realhousewivesofbuckscounty.com/2012/04/how-to-spray-paint-chandelier.html
I know this post they made isn't really a "new one" however it is a very helpful one. I just searched within Pinterest for 'upcycled chandeliers' and this is one of the pins that came up and was just want I needed. We just acquired a simple chandelier for $4 (yes you read that right) from an online facebook yard sale site and my plan is to paint it for our hallway (originally I wanted it for our dining room, but then my hubs reminded me of our ever ambitious and someday we'll get around to it plan of making a wine bottle lighting fixture for the dining room.) Anyways, I thought this was a great pin- as it helps me out in my future DIY!

4. Grey Likes Nesting: DIY Marquee Letters

http://www.greylikesnesting.com/diy-inspiration/diy-marquee-letters/
Source: http://www.greylikesnesting.com/diy-inspiration/diy-marquee-letters/
So I am a theater-geek, sorta. I do a lot of community theater, and so does my husband (and a good portion of our friends). So I have this vision for our hallway leading up to our upstairs- I want a wall of theater memorabilia- frames of show programs/ticket stubs, show pictures, etc. When I saw these Marquee letters, I immediately thought that someday, hopefully, I could create something like this for that hallway. They are so very Theater after all.

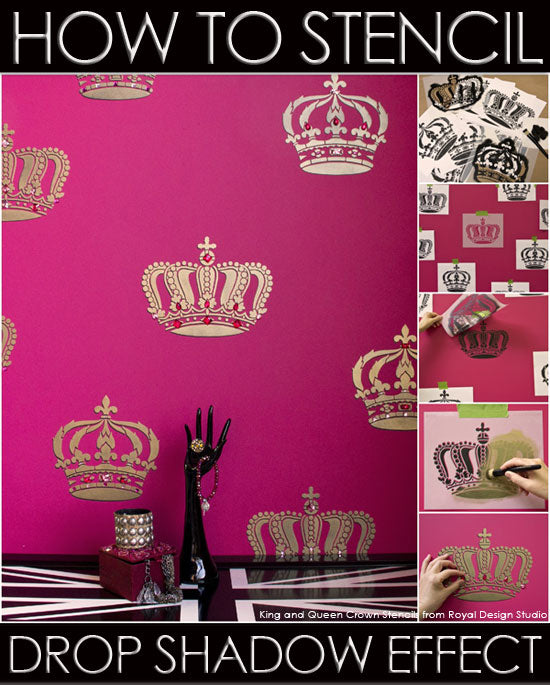
5. Royal Design Studio: How to Stencil a drop-shadow effect

http://www.royaldesignstudio.com/blogs/how-to-stencil/7143120-stencil-how-to-create-a-drop-shadow-effect-for-a-crowning-touch
Source: http://www.royaldesignstudio.com/blogs/how-to-stencil/7143120-stencil-how-to-create-a-drop-shadow-effect-for-a-crowning-touch
This particular pin also caught my eye, as I love the shadows, the shine and the bling to the wall. I was thinking something similar to this, but with damask print for our downstairs spare bathroom. I got totally inspired by this tutorial, that while stopping at Home Depot to pick up something simple, I picked up my Damask stencil and I am prepped to stencil and bling away soon!

So that's my top 5 pinspirations for today. Feel free to pin up these babies (from their original sources please people), since I sure did.
Also, please follow me on Pinterest @madcapfrenzy or even just follow a few boards (I know I have boat-loads that most people could care less about.) I do hope you at least follow "my projects" which are all the projects I personally do here on the blog-o. Until I get better versed on making that nifty 'hover over your picture to pin' deal, you can pin straight from "my projects" or from the individual posts within this blog.
Thanks all and I hope ya'll stop by again. I do love my followers. Feel free to follow me in any or all of the social media forms, which you can access from the buttons on the right (and follow me with blogger).
Thanks for stopping by and I hope these inspired you!
-M

Sunday, February 24, 2013

Banana so-called ice cream

So my hubs and I have been scouring the internet for a healthier alternative to ice cream. We came across a recipe for "banana faux ice cream", aka. 2 ingredient ice cream.
After some trial and error, we came to this recipe for the "So-called Banana ice cream".


This is the strawberry-banana variation. So my hubs enjoyed this so much, that he went out and purchased more bananas to try new flavors. haha

Ingredients:
  • 4 bananas (2 sliced and frozen, 2 sliced but NOT frozen)
  • 2-4 ounces of your "flavor" (see below)

Flavors variations: 
  • strawberry jam
  • peanut butter (some honey with the peanut butter probably is a lot better tasting than straight up pb & bananas)
  • chocolate syrup
  • mangoes (we used the frozen mangoes, and if you use this one, use 8 ounces of frozen mangoes)
  • caramel
  •  honey

Instructions:
Slice up 2 bananas, then stick them in the freezer. After about an hour or so, slice up 2 more bananas and take the frozen ones out of the freezer. Throw all of the bananas (frozen and not frozen) into the blender. Add your "flavor" to the blender mixer and mix till consistency of a think milkshake. Then freeze for another 1-2 hours (or longer). Now you have the "So-called Banana ice cream."


So far my favorite was the banana/mango- as it was more of a sorbet than an ice cream. Most of these are more of that way, and not really "creamy" like most ice creams are, since there is no real milk involved. However this is a GREAT alternative to ice cream for those who are lactose or who are on Weight Watchers (bananas are zero points all!).
Have a happy day all!
-M

Tuesday, February 19, 2013

LOVE yarn letters for bedroom wall

So after seeing some adorable yarn wrapped letters that people have put together, on Pinterest, I decided to try my hand at making some for our wall in our bedroom.


This was the first time I'd try these, so they are not the absolute best, but they are quite cute. Most I've seen are very 3d, however since mine were just going on the wall, I made mine a little more flat. The heart was the hardest one to do.


I used cardboard leftover from the packaging on a set of 3 picture frames, and cardboard from a beer box. haha (see the beer cardboard on the unfinished heart?)


I used yarn that had some silver sparkle to it (sadly the photo doesn't do it justice on the sparkle factor), but when the sun hits it in the morning, its quite cheery.
For a first attempt I think it turned out cute. Now to figure out if I want to put anything on the sides of it, or just leave the wall as is. Any suggestions?
Have a great DIY day all!
-M

Monday, February 18, 2013

Craft room-reorganized all red and white

Ok. By no means is my Craft room/office/spare room done. (Is anything ever really done anyway?) But for the most part, it is ready to be crafted in. I'm still in need of a good chair for here (and not use the dining room chair while sitting), but for the most part, it is ready to roll.
Eventually I want to get a different main table and paint the tv cabinet white (and the metal racking white), but for the most part, here is my craft room. (I know, I'm kind of a cluster of styles, but that's how I am).

 (Wendy just HAD to try out the cleared table. She's cute like that)

 I do adore Marilyn Monroe. The TV is a little bigger than I imaged it being- we aquired it from someone from my husband's work. So it kind of looks really big here. lol. I also decided to include some of my antique hat collection (which if you see my house, they are scattered all over the house).

 The gallery wall- dollar store clipboards and the long shelf my hubs made for my nutcracker collection (which only half is shown- I have to get the box out of the shed of the rest of the collection. haha). Also are my SAI (Sigma Alpha Iota) music fraternity for women, music notes.

 I'm happy to have found a spot for my typewriter. yay!

Gallery wall. My favorite part of the craft room right now.

I love red, so I went with red polka dots all over the place.
I know this craft room isn't the most FABULOUS as some peoples, but it serves its purpose, considering it is a kind of small room and my budget was next to nothing.
I do thank my hubs for putting up my shelves. They worked out nicely I think.


Any of you have craft rooms you'd like to share? I'd love to see everyone's way of crafting- mess, organized, or somewhere in between.
Have a great day all!
-M

Sunday, February 17, 2013

Moscato Cupcakes

So my husband loves to cook (crazy, I know). I came across the original recipe for this on Pinterest by Brooke Bakes, but we decided to tweak it a little bit. They don't look all that special, but they taste AMAZING!!!


You see, my favorite type of wine of all time is Moscato. I love it! 
Below is my favorite brand kind of Moscato- Elmo Pio Piemonte Moscato from Italy, though Barefoot Wine's Moscato is good too.


We had a friend's dinner party we were invited to and decided to make these Moscato cupcakes with Moscato cream cheese icing. They were such a hit- everyone was raving about it. My hubs posted it on his foodie site, but since he doesn't blog much, I thought I'd post it up here too. The same recipe should be a good cake if you prefer cakes (he made a White Zinfandel cake for Super Bowl with a similar recipe).

Moscato Cupcakes

Ingredients for cupcakes:
2 and 1/2 Cups Flour
1 and 1/4 Cups White Sugar
1 Cup Vegetable Oil
1/2 Cup Moscato Wine
3/4 Cup Non-Skimmed Milk (I usually use skim milk for most cooking, for this one you need to use a thicker dairy product, light cream, buttermilk, and whole milk all work fantastic)
2 Large Eggs
1.5 TSP Baking Soda
1 TSP Salt
1 TSP White Vinegar


Ingredients for icing:
1 Cup Confectionery Sugar
6-8 ounces of cream cheese (If you want you can substitute half the cream cheese with butter)
1/2 Cup Moscato
1 TSP Vanilla Extract


Recipe:

Step 1: Preheat oven to 350 degrees.

Step 2: Mix all ingredients together by hand. I personally prefer to mix all dry ingredients together first before adding in wet ingredients. 
Note: Optional for both or either: A dash of food coloring or grenadine to give the cupcakes some color.

Step 3: Bake for 10-15 Minutes, or however long you think for them to be done.

Step 4: While letting cupcakes cool, create Icing.

Step 5: Whip icing ingredients together in a bowl. The add icing to cooled cupcakes. We put in a bag and cut the tip to squirt it out, but you can just spread it on with a knife if you want.

Step 6: Enjoy!

WARNING: Because you never bake the Icing these cupcakes will remain Alcoholic, just remember that, while 1/2 Cup of Moscato divided among however many cupcakes you make is doubtful to get any adults drunk, keep this in mind around children, etc.


These were such a hit. Everyone raved that the flavor was amazing. So I hope you all enjoy it and try making some yourself!
-M

Friday, February 15, 2013

Daydreams of an outdoor firepit area

So recently my husband and I acquired 4 benches (with seats) from his work. They decided they wanted to upgrade their indoor bench/seating area to something else. Us being the DIY type, jumped at the chance to acquire these pieces. So here is our plan:


Basically arrange the benches in a square around a firepit that we hope to build in the backyard. We have to stain/prep/paint the wood benches so they are more outdoor friendly, as well as cover the seats with more water-resistant fabric.


A friend online suggested that we turn one of the holes where a seat goes and make it a spot for a cooler to be stuck in (great suggestion btw), so we might end up doing that with one of the benches (maybe the small one?).


So we have great plans for this, but I'm so nervous as I've never worked on such a big project for an outdoor space. Anyone have any suggestions or tutorials on making furniture more outdoor friendly?

Thanks for stopping by. Feel free to see some of my inspirations for the future space on my pinterest board for the Yard/Patio, or follow me on Pinterest in general!

Other than that, we've been busy finishing up the bedroom decor and the hubs put up shelves in my craft room, so that is coming along nicely! Once these are more complete, I'll show pics! I've been also trying to figure out how to fixup our cruddy rusty storm doors. I think I might paint them, but not sure what color. What do you guy think? Right now it is white and the door is dark green. I'm thinking painting it the same color as the door (if I can find the paint), like ones I found on pinterest (see my yard/Patio board above).

Also, of course Wendy has been helping out around the house too! lol


Also, can I just say I've become completely addicted to "Supernatural" via Netflix. I have blown through almost all of the 7 seasons of episodes on Netflix within this month, and I don't know what I'm gonna do when I run out!


Anyways, have a great weekend all! Stay tuned for the recipe to my Valentine's Day Lemon Sugar cookies! :D
-M

Spare drawer turned into wall mini bookshelf

So after redoing our bedroom dresser upstairs, we had an extra drawer. I had seen somewhere someone making an entire wall of drawers into bookshelves. I decided to add it to our dining room and make it hold cook books. That wall looked so blank to me originally, so I decided to do some fun wall decor by adding the drawer cubby there.

Once we got rid of the big desk drawers that were in that corner, we moved the bar cart also to there. Right now it is all decked out for Valentine's Day, but I know it will match much better when i don't have Red stuff everyone. lol


Basically our Dining room is Brown, Gold and Black mostly. I know the cart matches the kitchen the best, but right now, it fits nicely in that spot of the dining room. Maybe once I add some silver accents through the room it will blend better. (who knows!)
Anyways, we basically drilled this drawer to the wall and tada! Book cubby! Perfect size for our cookbooks. :D


 It was a simple project and I think completes the spot. I hope you enjoyed it! Have a great day all!
-M

Sunday, February 3, 2013

Things are looking different...

Just so you all know:
Yes, you are at Madcap Frenzy, my blog site.
I just have decided to do some "sprucing up", so don't mind the mess as I try to make this blog looking nice.


After a lot of thinking, I decided that there really needs to be 3 separate parts to my online design presence. So, within the next month, I'm going to redesign these three aspects and make them closer to what I want them to be. There is my profession design work, spare time/personal projects, and then my hopeful freelancing invitation design outlet.

1. My person portfolio of design works, http://www.morgainefordworkman.com/portfolio
Basically this is my professional graphics design portfolio. My way of showing off the design projects that I do in my professional career. Eventually I'll figure out the right way to redirect www.morgainefordworkman.com to the portfolio portion (my OLD portfolio is still on the original link, and I can't figure out how to get rid of it for my /portfolio wordpress site- anyone know the easiest way to redirect without losing my /portfolio site?)

2. My blog here, http://www.madcapfrenzy.blogspot.com/
This is my blog where I show all the DIY projects, papercrafting- scrapbooking and cards, and all the crafty fun projects I do in my spare time. Under this umbrella is also my Stepping with Smiles- the area where I update once a week on how I am staying healthy (or not) and keeping a fit way of life. Also is my 365 Days of Mo- my photo a day, and Life's A Game- the place where my husband and I talk about video games, primarily World of Warcraft, as well as sharing our parody songs we create. I also share my discount finds, DIY projects, Olioboards and decorations/home decor. Basically this is the place where I post all the crafty stuff I do.

3. Frenzified, www.frenzified.com
This site started out as a digital image store that I created after my mom mentioned that she needed digi images for a card she was making in a swap. It started out decent, with challenges and all that jazz, however over the years I have found Digi image stores just struggle massively when you are the only designer- I can't create the amount that most people would want in selection, all by myself, so later this year the site is going to go through a big overhall. No longer will it be a digital image store. Instead, it will be my place JUST for invitation design. Over the years I have found that invite design is something all my friends want from me, and something I enjoy the most. So, later this year (or if I get ambitious, later this month) Frenzified digital image store will be turned into Frenzified invitation design. "Is your life in a frenzy? Frenzified is here to be your friend in invite design!" So, on this portion of my life, stay tuned. haha

Anyways, Enjoy and let me know if you have any ideas on things you want to see here on this blog.
Hugs all!
-M