Monday, November 30, 2009

Results of a Black Friday crop

So my mom and I decided to spend Black Friday at a Scrapbook crop over at Scraptacular.
From 10am to 10pm we cropped till we dropped...literally. Haha. I created 3 single layouts, 3 double layouts, and 1 card. My mom did a LOT more than I did, but I'm a slow scrapper. lol.
I'm holding off from showing you one of the layouts and one of the cards, since I decided I would enter them for a call at Paper Crafts magazine and at Scrapbook Trends Magazine. I've never had anything published, but I decided to try it out. How have any of you gotten things published? Any tips? Just wondering...
Anyways, I had a blast. Before I went to the crop, I sketched out some layout ideas mixed with layout sketches from others, so I wouldn't get a brain block at the crop. The ladies were awesome to hang out with, and I would gladly do another crop some other time! I wish I could have more time to do more crops. I feel I always get so much more done at them, then at home, where all the distractions are. :)
So, here is the layouts! Enjoy!

(This is from this past year's Fourth of July fun. We all went out for margarita at the shore and it was awesome! That's me on the left bottom...my chunkier time of the year. ugh)


(I still need to do my journaling. I forgot my journaling pens at home...hehe)

 (This is a Christmas party layout, from my college years. My senior year, a few friends all got together for a Christmas martini party. Fun stuff!)

(I used these hocus pocus chipboard for this. Even though they are made for halloween, white sparkle is good for winter too!)


(This if from our 1st wedding anniversary at the beach. Fun in the Sun!)

(I am in love with these foamy thickers. So cute!)

(I did this layout for my kitty, C.J. He's my other love of my life. hehe)


(The large chipboard shape I got from Oriental Trading Co. 
The little one and the gels are from the set that came with the paper. )


(This layout is for a baseball game we went to with a few friends, I think last year sometime. 
I just didn't know which way I liked it better. The above or below. What do you think?)


(Which do you think? This one or the other one?)


(Chipboard fun!)

I had a blast at this crop. I can't wait to do another. Since I don't do scrapbook pages often- my attention span gets the best of me usually, I am so happy to have gotten so many done! yay!
Now I'm off to get ready for work (night shift tonight) then tomorrow we plan to start putting all the Christmas decor together and around the house.
Have a good Monday/Cyber Monday. :)
-M

Wednesday, November 25, 2009

Jingle Bells...Batman smells...lol


"Jingle Bells, Batman smells, Robin laid an egg"...lol
I'll spare you from my totally wrong version of Jingle Bells. hehe. Anyways, today I"m gonna share with you a little project I did a few days ago, and am just now getting around to sharing it with you all. This little project happened totally by accident. You see, I have a box, that is just for containers, etc. to alter and decorate for gifts and such. I had saved a few of these lemonade packet tube/containers:


They hold large lemonade packets to make pitchers of lemonade. I believe we originally got them at Rite Aid. Anyways, I saved these knowing that SOMEDAY I'd figure out something to put in them and alter. So, I had stopped at Michael's ages ago, and in their dollar bin they had these lovely beauties...Jingle Bells!


They might still have them there, since I know I picked a few more up a couple weeks ago. I love the $1 area! Anyways, I had brought them home wanting something to do with them, and nonchalantly threw the jingle bells into the "box of alterable items" and they happened to fall into the Lemonade tube container. They just so happened to fit PERFECTLY inside! I could fit two jingle bells inside the tube and be able to close the tube right up totally. I knew right there that this was a project idea I had to do! So, I decided, why not do this like a mini tutorial in case anyone else wants to try their hand at altered fun!? Enjoy the rest of this post/tutorial. You never know what items will work together, until mini accidents happen. :)
Ok. So you have your Jingle bells and your tube container, now what? First I took the label off the container. They I cut out paper to fit around the tube. I used Making Memories FaLaLa scrapbook project pad paper for this. In this paper pack it has borders too, so I used the striped one also.


The striped border is for the seam, since the paper was ever so slightly too short. I also used the border for the top lid. Next I adhered the red paper to the tube, then the stripe border to cover up the part that is showing. I then took some green and gold ribbon and adhered it to the sides of the tube, since once it is all done, I'm going to tie a bow at the top to hold it all together.


Next I moved on to the lid. I first painted it red. Now you don't necessarily need to paint your lid if you're covering it all up, but I wanted to be certain none of the original blue showed through.


While the paint was still wet I sprinkled green/gold glitter on top. While the lid was drying I moved on to work on the Jingle Bells. Now they are cute in themselves so I didn't want to do too much to them. Also, I wanted to make sure they still fit in the container. I tied some of the green/gold ribbon around each.


I then took these adorable sticker glitter stars from Michael's that I got last year, and put them over the top part where the knot was.


Now that the bells are done and after the top is dry, I used some popups to raise up a circle I punched out of the same red paper as what is around the tube. I also adhered the border around the edge of the tube top.


I then stamped a Poinsettia stamp, from Verve stamps "Poinsettia Christmas" set with Color Box ink.


I then colored it in (once the ink was dry) with Le Plume II markers. I decided it needed something, so I stamped the image again over top of the already colored image, and while the ink wasstill wet I put some K & Company glitter on top.


I then punched the flower and adhered it to the already popped up top part. (now you can adhere it first, then pop it up if you like, I just wasn't sure how I wanted it all to go first, so I did it that way).
I then poked a hole in the side of the  tube and stuck the large Poinsettia to the side of the tube, by putting the little nub through the hole and using clear packing tape to hold it in place on the inside of the tube. I then decorated the large poinsettia (which you can do first, before adhering it) since I realized I wanted it to be glittered too. It already was glittery when I got it (it was taken off an old Christmas Wine cover a friend gave me ages ago) but some of the glitter was falling off on the inside part, so I used Stickles over each inside petal and left the chunky glitter on the outside part of the flower. I then put the jingle bells inside the tube, put the lid on, then tied the ribbon in a bow on the top.


To make the tag, I used a tag cut out of green paper on my brand new Cricut. (it was the first thing I used it for!) I got it at A.C. Moore's pre-Black Friday Sale. I got the Cricut (personal cutter, the original one) a cutting mat, blade, and a cartridge for $98 only! I got the 2nd to last one they had at that store. :) I used some Christmas money given to me by my in-laws, who basically said, buy what you want for your own Christmas present. So I did just that. Now all I have to do is save up for the "Sure Cuts A Lot" software so I can do fun stuff like KWerner does (I <3 her stuff!). Anyways, back to this project. So I cut out the tag, then used a scrap of the border on the edge of the tag. I then stamped using a stamp from the Making Memories FaLaLa set.


I then used some string and attached to the top bow. And there you have it! A Jingle Bell Gift! Isn't it cute! I am so happy how it turned out!


Now everyone be quiet and don't tell anyone about it. You never know who might be getting one for Christmas. hehe. I'm in an Altered swap, so I'm considering making something similar to this for it, since it turned out so cute! I am so happy it turned out well, considering the whole idea came about TOTALLY by ACCIDENT! hehe
Anyways, I'm off to clean up the house, since my parents are coming in from Michigan tomorrow. During the day, Hubby and I are going to his work to spend Thanksgiving with some of the residents at his job. He works for a Senior care facility, so we thought it would be nice to spend time with some of the people there whose family can't visit them, or they can't visit their families, since my parents are coming in till the night time and we are officially celebrating Thanksgiving on Sunday instead to get everyone together. :) It's all about giving thanks everyone.
Happy Thanksgiving everyone and enjoy you time with people who care for you. If you can't spend it with your family and friends, I send my personal Hugs to each and every one of you, from me to you. Hugs and Happy Thanksgiving!
-M

Friday, November 20, 2009

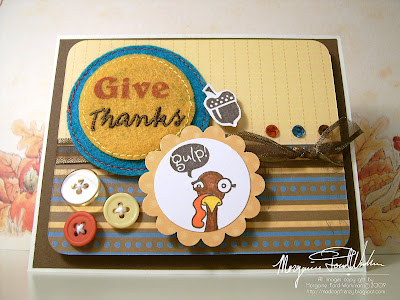
Scared turkey

Today I'm sharing with you another card for a co-worker (it's beginning to be a weekly think, I know!...all these custom card orders, I need to make myself a business card or something, haha!) and what I decided to make my placecards look like for this year's Thanksgiving here at the house of Mo. :)
 To start, the card is for my co-worker's son, a middle schooler, so I decided to make it a little funny. Hence, alive and scared turkey out front, and then cooked turkey inside...hehe. I finally found a card idea to use one of the awesome Recollections felty embellishments, and I think it matched perfect with the paper. The funny part about that paper (also by Recollections) I had actually adhered the two pieces of paper together, then realized I like the combo of what was on the other side (double sided paper), so I flipped it over, and added a ribbon around it, and started my card from that choice! Don't you just love it when things like that happen? Anyways, here's the card!

(I wouldn't have thought teal would look so pretty with the rest of the fall colors, but I dig it!)

(scared turkey, buttons, and felties! All the best things in life...hehe)

(cooked turkey!)

I also worked on my placecards for our Thanksgiving dinner. This year, since my 'rents are coming to visit, but coming in from Michigan on Thanksgiving itself, we decided to celebrate on the Sunday after Thanksgiving. That way, the 'rents can relax a little beforehand, and my hubby's famiy can all make it too! However, I'm a scared turkey myself, since this is the first time we have ever hosted Thanksgiving at our house. Eek! So, the table cloth chosen looks like this:


So I decided to pick the colors from there the best I could, and made these placecards using my new Nesti I got 50% off at Micheal's over a month ago (That was my big purchase of the month, lol!) and I also used an adorable Thanksgiving stamp set I got on sale also at Micheal's (that same day), since the day after Halloween they were ushering in all the Christmas stuff, and had all the Halloween and harvest/Thanksgiving stuff 50-75% off. I love sales...I think these days I only shop in the sale racks anymore. :)

(this one is mine- the first one I did, so if I screwed it up, it was ok. hehe)

(I <3 buttons!- These are from Papertrey Inks!)
(here's the whole slew of placecards, 7 adults and 2 kiddos)

I think it has the feel of some of the PTI designers, like Nichole, Mish and Pine, but I think it works, and should match the tablecloth. I now have the centerpiece and rest of the placesettings to figure out. This year I want to go all Martha Stewart on Thanksgiving, so I have to have everything match. :)
Hope everyone is having a great Friday. I'm off to go do some cleaning around the house. It's amazing how quickly your home becomes a reck when live with a messy man! haha
Have a Friday Funday!
Hugs all!
-M

Wednesday, November 18, 2009

A shoulder to cry on

So I was requested of a co-worker, like I have been a lot recently, to create a card to give to his friend who is need. I had many similar sentiments, however none did the trick totally. My co-worker wrote up basically what he wanted to say, and I thought, "Hey, why don't I just make a digital stamp version of this to use." I whipped it up in a jiffy in Photoshop, printed it on cardstock, then cut it out with my very first Nesti I got a few months ago- with a discount coupon for Micheal's. He also gave me her name, which I decided to make the main focus for the front of the card, while the sentiment was for inside.
Here it is.
 (I decided to go for the "pretty in pink" look)

 (These chipboard letters actually had little purple flowers on them, but they didn't match, so I covered them with other flowers of the right match)

(the inside sentiment)

I also created another baby shower card, this one for a co-worker's daughter who is also having a baby boy. He liked what I did with the baby shower card I made for our one co-worker, and wanted a similar card. Well, 1) I didn't have the same chipboard letters left, 2) I didn't have the same ribbon or paper left either 3) I  realized after I stamped the image and already adhered the back to the main image paper, that damn, there seems to be a decent amount of space at the top, compared to the original card I made, so I added another sentiment. "Sweet" to the top. Here it is, a very similar resemblance to that of my previous baby shower card, but slightly different. Yay for Stickles making non-sparkle chipboard letters Sparkle! Enjoy.

(oh baby! hehe)
Have a great day/night all!
-M

Saturday, November 14, 2009

Digiments November Release!

Make sure you check out Digiments today for the official November release! It is a Christmas special happening over there, 24 Digiments for only $8! And if you buy one full set, you get another set for 1/2 off (So that's only $4) to give to a friend that Digiments will send to them on your behalf. It's great to give for Christmas to all those swapping sisters or fellow papercrafting buddies! Check it out today over at Digiments!
Here is a card I made with one of the new releases! This release was one of my favorites, since there are plenty of Christmas (and non-Christmas) sayings...perfect for all those Christmas cards you want to make!

(There's snowflakes galore in this card!)

(I think the elegance of this Digiment worked well with the wintery sparkle. don't you?)

Okeys ladies and gentalmen, Enjoy the card, check out Digiment's release today and have a wonderful Saturday! I'll be helping out with the hubby's last showing of "Rope" today, so think of me while you're papercrafting!
-M

Friday, November 13, 2009

Digiments Sneak peek and Day 4 of Christmas cards


Happy Friday all. Christmas cards are still rolling out over here. Today I have a sneak peek for you from the Nov. Digiments Release. Make sure you check out all the other awesome previews over at Digiments today, and get your Digiments tomorrow on the official release!
This release is 24 Digiments for $8. And, when you buy 1, you can get another for $4 and Digiments will send it to a friend on your behalf. So one for you and one for your friend for only $12. I think its a good deal, for the holidays! So check it out here!

(this is one of those long cards. I think it turned out better than I thought it would when I was putting it all together.)

(It's hard to tell in the photo, but those are actually dark green (not black) buttons)

(I thought the tree needed some bling. hehe)

I also have Day 4 of my last weekend's Christmas card making. These are the last of the cards I made during my "Christmas Cardmaking" day with my co-worker and new-found convert to papercrafting. :) Enjoy all!

(It's all about the different paper scraps in this one)

("Up on the housetop...click click click...")

(These are the "mini" cards...aka. tags as my friend says)

(and this little square card ended up being more simplistic than I originally planned)

(sparkle!)
(These are all the cards in total done that weekend, so you all can see the size differences)

Well, I'm off to go make the "show sandwiches" for my hubby's play. This is the last weekend of shows. In a way I will be so happy when it is over, so we actually have free time again, but we'll miss hanging out with all the fun people on a regular basis from the show.
Anyways, have a great Friday the 13th! :)
Laters all!
-M

Thursday, November 12, 2009

Christmas cards: Day3


It's Day 3 of Christmas card mania! This is gonna be a quick post since it is 3:30 am, I have to take my hubby to work at 7am, then get some sleep during the day so I can work the night shift. Luckily I get Friday/Saturday off to actually have time to DO something other than drive and work. *sigh*
Anyways, here is day 3's worth of Christmas cards. Enjoy!

(I was going for the vintage ornament look, similar to that of Dawn McVey, however I don't own the Papertrey Ink's vintage ornament set, so I tried it with this pop up sticker thing.)

(I wanted to match the pink in this ornament for a "girly" christmas card)

(for ths one I wanted to go for a quilted look. But since I was having trouble getting my sewing machine working for it, it became far more simplified than I originally thought.)

(this little joy popup fit perfect with my all green color scheme)

Also, stay tuned for some Digiments previews! I haven't decided if I'm gonna preview my cards for ya'll tomorrow or Friday. But stay tuned and check out all the other great previews for the November Digiments release over at the Digiments blog! Check it out!
If you haven't yet, check out my two previous day's posts for more Christmas card fun, Here and here.
Later all and leave me some comment love all! I feel like I"m talking to thin air these day.
Night night (or morning for some of you). Laters.
-M